Understanding Vapor Barrier Installation
What is a Vapor Barrier?
A vapor barrier is a material designed to resist the diffusion of moisture through walls, ceilings, and floors, particularly in areas susceptible to high humidity and moisture intrusion. Typically made from polyethylene or other similar materials, vapor barriers are critical in construction and renovation projects to protect structures from moisture damage. By acting as a barrier against water vapor, these installations help maintain a dry environment, preventing mold growth, wood rot, and other moisture-related issues.
Importance of Vapor Barrier Installation
The installation of a vapor barrier is essential for maintaining the integrity of your home. Moisture can lead to a variety of problems, including mold growth, structural damage, and decreased indoor air quality. By implementing proper Vapor Barrier Installation, homeowners can significantly reduce these risks. A well-installed vapor barrier contributes to energy efficiency as well, since it helps in maintaining temperature and humidity levels inside the home. Understanding its importance is crucial for anyone looking to safeguard their living spaces.
Types of Vapor Barriers
Vapor barriers come in various types, each suited for specific applications and environments. The following are common types:
- Polyethylene Sheets: The most common type, available in various thicknesses, typically ranging from 4 to 20 mils. Thicker sheets provide better protection.
- Foil Barriers: Often used in conjunction with insulation, these barriers reflect moisture and help regulate temperature.
- Liquid Applied Barriers: These are painted on surfaces and cure to form a continuous barrier. They’re often used for irregular surfaces.
Preparing for Vapor Barrier Installation
Assessing Your Space
Before installation, it’s crucial to assess the area where the vapor barrier will be applied. Inspect crawl spaces, basements, or any other areas with potential moisture issues. Look for signs of existing moisture problems, such as water stains, mold, or a musty odor. Proper assessment allows for a tailored approach, ensuring that all moisture entry points are identified—critical to successful installation.
Materials Needed for Installation
Gathering all necessary materials before starting your project can save time and ensure a smoother installation process. Essential materials typically include:
- Polyethylene vapor barrier sheeting
- Vapor barrier seam tape
- Utility knife
- Stapler or adhesive
- Measuring tape
- Safety gear (gloves, mask)
Cleaning and Preparing the Area
Preparation is key to ensuring the effectiveness of the vapor barrier. Start by cleaning the installation area thoroughly. Remove any debris, dirt, or old insulation. Address any visible moisture issues before installation, which may involve fixing leaks, sealing cracks, or addressing drainage issues. A clean, dry surface is vital for optimal adhesion of the vapor barrier.
Step-by-Step Guide to Vapor Barrier Installation
Measuring and Cutting the Barrier
Accurate measurements are essential for a proper fit. Measure the dimensions of the area to determine how much vapor barrier material you will need. Cut the polyethylene sheeting to size, ensuring that there is some overlap between sections to maintain a continuous barrier. If multiple sheets are used, they should overlap by at least 12 inches.
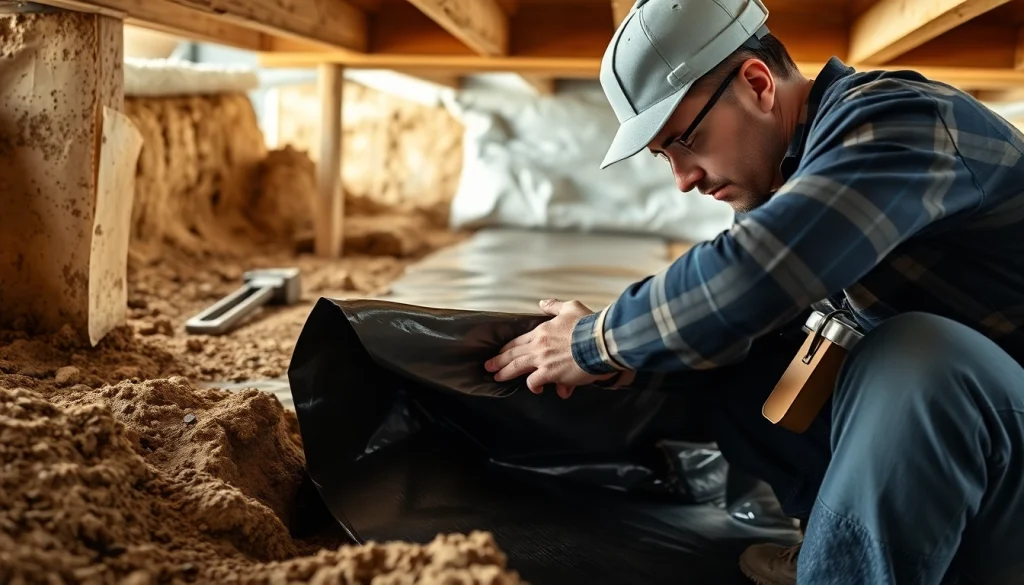
Securing the Vapor Barrier
Once cut, lay the vapor barrier flat across the designated area, ensuring it covers all corners and edges adequately. Use staple guns or an adhesive to secure the barrier in place. For crawl spaces and basements, the barrier should extend up the walls to about six inches above the ground level. This coverage helps to prevent moisture from seeping in from the sides.
Sealing and Finishing Touches
After securing the barrier, it’s time to seal the seams. Use vapor barrier seam tape to secure any overlaps and seams, preventing moisture penetration through any vulnerabilities. A thorough examination should be performed to ensure there are no gaps or holes in the installation. Finally, trim off any excess material and securely fasten the barrier against the walls or structural surfaces.
Common Challenges in Vapor Barrier Installation
Mistakes to Avoid
Common mistakes in vapor barrier installation can compromise its effectiveness. Some pitfalls include:
- Not overlapping seams properly, which can create gaps for moisture.
- Failing to seal edges and overlaps, thus allowing moisture infiltration.
- Using too thin of a material in high-moisture areas.
Being aware of these challenges is critical to ensure a successful installation.
Troubleshooting Issues
If you encounter issues post-installation, it’s essential to address them promptly. Common problems include visible moisture on the side of the barrier or signs of mold. Make sure the installation has no gaps, and inspect the area for any other moisture entry points. Consider using a moisture meter to identify hidden problems and take corrective measures swiftly.
Maintenance Tips
To keep your vapor barrier effective, regular checks should be performed. Inspect the installation at least once a year or after significant weather events. Ensure that there are no tears or damage to the barrier. Additionally, maintain proper drainage in and around your property to prevent excessive moisture accumulation.
FAQs About Vapor Barrier Installation
What is the best type of vapor barrier?
The best type of vapor barrier depends on the specific use case. Generally, 6-mil polyethylene is suitable for crawl spaces, while foil barriers may work better in attics where thermal insulation is needed.
How long will a vapor barrier last?
When installed correctly, most vapor barriers can last 10 years or more. Regular inspections can help spot and address any issues before they worsen.
Can I install a vapor barrier myself?
Yes, many homeowners can install a vapor barrier themselves, especially if they follow a proper guide. However, consider professional assistance for complex installations.
How do I know if my vapor barrier is effective?
Check for signs of moisture, mold, and humidity levels in the areas where the barrier is installed. A consistent reduction in these signs indicates effectiveness.
What happens if I don’t use a vapor barrier?
Not using a vapor barrier increases the risk of moisture issues such as mold growth, structural damage, and poor indoor air quality, leading to higher maintenance costs.